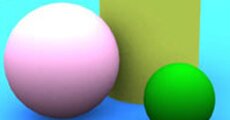
<?xml version="1.0" encoding="UTF-8"?>
<rss version="2.0"
	xmlns:content="http://purl.org/rss/1.0/modules/content/"
	xmlns:wfw="http://wellformedweb.org/CommentAPI/"
	xmlns:dc="http://purl.org/dc/elements/1.1/"
	xmlns:atom="http://www.w3.org/2005/Atom"
	xmlns:sy="http://purl.org/rss/1.0/modules/syndication/"
	xmlns:slash="http://purl.org/rss/1.0/modules/slash/"
	
	xmlns:media="http://search.yahoo.com/mrss/"
	>

<channel>
	<title>Seremeres Blog</title>
	<atom:link href="http://blog.seremeres.com/?feed=rss2" rel="self" type="application/rss+xml" />
	<link>http://blog.seremeres.com</link>
	<description>Tutorials, Tips and Art by Serena Samborski</description>
	<lastBuildDate>Fri, 21 Oct 2011 03:26:36 +0000</lastBuildDate>
	<language>en</language>
	<sy:updatePeriod>hourly</sy:updatePeriod>
	<sy:updateFrequency>1</sy:updateFrequency>
	<generator>http://wordpress.org/?v=3.0.1</generator>
		<item>
		<title>Halloween Anime Pumpkin Video Tutorial</title>
		<link>http://blog.seremeres.com/?p=223</link>
		<comments>http://blog.seremeres.com/?p=223#comments</comments>
		<pubDate>Mon, 17 Oct 2011 18:17:33 +0000</pubDate>
		<dc:creator>Serena</dc:creator>
				<category><![CDATA[Featured]]></category>
		<category><![CDATA[Tutorial]]></category>

		<guid isPermaLink="false">http://blog.seremeres.com/?p=223</guid>
		<description><![CDATA[Last year I made an anime pumpkin and people really seemed to like it. This year I thought I&#8217;d make a tutorial for how I made it. This is my first video tutorial! Hope you [...]]]></description>
			<content:encoded><![CDATA[<p>Last year I made an anime pumpkin and people really seemed to like it. This year I thought I&#8217;d make a tutorial for how I made it.  This is my first video tutorial!  Hope you like it!<br />
<iframe width="560" height="315" src="http://www.youtube.com/embed/iCJhKC5imfU" frameborder="0" allowfullscreen></iframe><br />
Pattern (click for full image):<br />
<a href="http://blog.seremeres.com/wp-content/uploads/2011/10/PumpkinPattern1.gif"><img src="http://blog.seremeres.com/wp-content/uploads/2011/10/PumpkinPattern1-520x672.gif" alt="" title="PumpkinPattern1" width="520" height="672" class="aligncenter size-medium wp-image-226" /></a><em></p>
]]></content:encoded>
			<wfw:commentRss>http://blog.seremeres.com/?feed=rss2&amp;p=223</wfw:commentRss>
		<slash:comments>0</slash:comments>
	
		<media:thumbnail url="http://blog.seremeres.com/wp-content/uploads/2011/10/PumpkinPattern1-230x120.gif" />
		<media:content url="http://blog.seremeres.com/wp-content/uploads/2011/10/PumpkinPattern1.gif" medium="image">
			<media:title type="html">PumpkinPattern1</media:title>
			<media:thumbnail url="http://blog.seremeres.com/wp-content/uploads/2011/10/PumpkinPattern1-230x120.gif" />
		</media:content>
	</item>
		<item>
		<title>Beach Camera Girl Study</title>
		<link>http://blog.seremeres.com/?p=214</link>
		<comments>http://blog.seremeres.com/?p=214#comments</comments>
		<pubDate>Tue, 07 Jun 2011 13:04:32 +0000</pubDate>
		<dc:creator>Serena</dc:creator>
				<category><![CDATA[Art]]></category>

		<guid isPermaLink="false">http://blog.seremeres.com/?p=214</guid>
		<description><![CDATA[I&#8217;m always trying to brush up on my art skills, and recently I&#8217;ve created a folder full of photos to study from. I&#8217;ve divided them into two categories: Pencil and Speedpaint. The &#8220;Pencil&#8221; folder is [...]]]></description>
			<content:encoded><![CDATA[<p>I&#8217;m always trying to brush up on my art skills, and recently I&#8217;ve created a folder full of photos to study from.  I&#8217;ve divided them into two categories: Pencil and Speedpaint.  The &#8220;Pencil&#8221; folder is meant to help me learn to draw (lines), and the &#8220;Speedpaint&#8221; folder is meant to help me learn how to paint.  Here is a piece from the latter:<br />
<a href="http://blog.seremeres.com/wp-content/uploads/2011/06/SpeedPaint_YiRan2.jpg"><img src="http://blog.seremeres.com/wp-content/uploads/2011/06/SpeedPaint_YiRan2-520x832.jpg" alt="" title="SpeedPaint_YiRan2" width="520" height="832" class="aligncenter size-medium wp-image-215" /></a><br />
The original photo is <a href="http://i.imgur.com/pPVpr.jpg">here</a>. </p>
]]></content:encoded>
			<wfw:commentRss>http://blog.seremeres.com/?feed=rss2&amp;p=214</wfw:commentRss>
		<slash:comments>1</slash:comments>
	
		<media:thumbnail url="http://blog.seremeres.com/wp-content/uploads/2011/06/SpeedPaint_YiRan2-230x120.jpg" />
		<media:content url="http://blog.seremeres.com/wp-content/uploads/2011/06/SpeedPaint_YiRan2.jpg" medium="image">
			<media:title type="html">SpeedPaint_YiRan2</media:title>
			<media:thumbnail url="http://blog.seremeres.com/wp-content/uploads/2011/06/SpeedPaint_YiRan2-230x120.jpg" />
		</media:content>
	</item>
		<item>
		<title>My top 5 hidden gem songs of 2010</title>
		<link>http://blog.seremeres.com/?p=205</link>
		<comments>http://blog.seremeres.com/?p=205#comments</comments>
		<pubDate>Mon, 17 Jan 2011 00:50:17 +0000</pubDate>
		<dc:creator>Serena</dc:creator>
				<category><![CDATA[Uncategorized]]></category>

		<guid isPermaLink="false">http://blog.seremeres.com/?p=205</guid>
		<description><![CDATA[Here, in no particular order are 5 of the coolest songs that have come out in 2010. I call them &#8220;hidden gems&#8221; because they&#8217;re probably not something you&#8217;d hear on the radio (but who knows&#8230; [...]]]></description>
			<content:encoded><![CDATA[<p>Here, in no particular order are 5 of the coolest songs that have come out in 2010.  I call them &#8220;hidden gems&#8221; because they&#8217;re probably not something you&#8217;d hear on the radio (but who knows&#8230; I don&#8217;t really listen to the radio anymore).</p>
<p><strong>Perfume &#8211; Natural ni Koishite</strong><br />
<iframe title="YouTube video player" class="youtube-player" type="text/html" width="500" height="311" src="http://www.youtube.com/embed/edyARJq9sgM" frameborder="0"></iframe><br />
This song was originally created as a commercial jingle for a Japanese apparel company called &#8220;Natural Beauty Basic&#8221;. It&#8217;s catchy and energizing, with chiptune-inspired electronic beats and sugar-sweet vocals.  </p>
<p><strong>Rainbow &#8211; Mach</strong><br />
<iframe title="YouTube video player" class="youtube-player" type="text/html" width="500" height="405" src="http://www.youtube.com/embed/bl9Sr49VrGU" frameborder="0"></iframe><br />
Rainbow is a seven member group from Korea.  I don&#8217;t have much to say about this song.  It&#8217;s one of the best pop songs to come out of Korea in 2010.  They are light on the Engrish, mostly keeping it a part of the backup vocals.  I like this since awkward Engrish vocals can really ruin a song for native English speakers (I just couldn&#8217;t get into their first single, <a href="http://www.youtube.com/watch?v=Dvq8gu1Few0">Gossip Girl,</a> for that reason).</p>
<p><strong>Uffie &#8211; ADD SUV</strong><br />
<iframe title="YouTube video player" class="youtube-player" type="text/html" width="500" height="311" src="http://www.youtube.com/embed/pV72JYjO6MM" frameborder="0"></iframe><br />
Uffie is someone I&#8217;ve been paying attention for a while now, since first hearing her on Justice&#8217;s <a href="http://www.youtube.com/watch?v=ZoUj-mfzQ7A">Tthhee Ppaarrttyy</a> (a song I&#8217;m not really a big fan of to be honest).  Between this and <a href="http://www.youtube.com/watch?v=7j1U0kixp-g">MCs Can Kiss</a> released in January, I think ADD SUV is the stronger piece.  Uffie is actually rapping about something other than her in-your-face apathy. </p>
<p><strong>Mia &#8211; XXXO</strong><br />
<iframe title="YouTube video player" class="youtube-player" type="text/html" width="500" height="311" src="http://www.youtube.com/embed/sfbQ5mHWkOs" frameborder="0"></iframe><br />
This song definitely has more of a pop sound than the rest of her music&#8230; and that&#8217;s why I like it.  The video is really stylish, I&#8217;ve never seen those tacky MySpace animated GIFs interpreted in such a classy way, with just a touch an irony.  Combine that with the arabic-style lettering and you&#8217;ve got a really unique visual experience.</p>
<p>she &#8211; Touch and Go<br />
<iframe title="YouTube video player" class="youtube-player" type="text/html" width="500" height="405" src="http://www.youtube.com/embed/72adAIhtYIw" frameborder="0"></iframe><br />
&#8220;she&#8221; is the Polish (and male) musician Lain Trzaska.  Like most of his pieces, this one is short and sweet.  It&#8217;s a great mix of anime soundbites, hip hop samples and some gamer flair.</p>
<p><strong>What is your favourite &#8220;hidden gem&#8221; of music from 2010?  Please reply in the comments, nothing like sharing cool music!</strong></p>
]]></content:encoded>
			<wfw:commentRss>http://blog.seremeres.com/?feed=rss2&amp;p=205</wfw:commentRss>
		<slash:comments>1</slash:comments>
	
	</item>
		<item>
		<title>G.E.E.R. &#8211; The Christmas Game That Never Was</title>
		<link>http://blog.seremeres.com/?p=190</link>
		<comments>http://blog.seremeres.com/?p=190#comments</comments>
		<pubDate>Thu, 23 Dec 2010 16:30:07 +0000</pubDate>
		<dc:creator>Serena</dc:creator>
				<category><![CDATA[Uncategorized]]></category>

		<guid isPermaLink="false">http://blog.seremeres.com/?p=190</guid>
		<description><![CDATA[A little while ago I was digging around in some older folders and I found a little gem. Back in 2002, I was playing with an application called Game Maker around Christmas time, and had [...]]]></description>
			<content:encoded><![CDATA[<p>A little while ago I was digging around in some older folders and I found a little gem. Back in 2002, I was playing with an application called Game Maker around Christmas time, and had started a little game.  It was called &#8220;G.E.E.R&#8221; which stands for &#8220;Guardian Elf &#8230;something something?&#8221;.  I honestly cannot remember the rest of the name.  Basically I think it was about an elf named &#8220;Chickadee&#8221; who was charged with keeping the North Pole secure from intruders while Santa and the other elves worked at building and preparing to deliver the toys.  Chickadee used martial arts, and had both a handgun and a bazooka (named &#8220;Holly&#8221;) to accomplish her goal.   </p>
<div id="attachment_191" class="wp-caption aligncenter" style="width: 205px"><a href="http://blog.seremeres.com/wp-content/uploads/2010/12/ChristmasSprites.png"><img src="http://blog.seremeres.com/wp-content/uploads/2010/12/ChristmasSprites.png" alt="" title="ChristmasSprites" width="195" height="197" class="size-full wp-image-191" /></a><p class="wp-caption-text">Fun for the whole family!</p></div>
<p><a href="http://blog.seremeres.com/wp-content/uploads/2010/12/Chickadee.jpg"><img src="http://blog.seremeres.com/wp-content/uploads/2010/12/Chickadee-520x399.jpg" alt="" title="Chickadee" width="520" height="399" class="aligncenter size-medium wp-image-192" /></a></p>
<p><a href="http://blog.seremeres.com/wp-content/uploads/2010/12/Chickadee_02.gif"><img src="http://blog.seremeres.com/wp-content/uploads/2010/12/Chickadee_02.gif" alt="" title="Chickadee_02" width="42" height="52" class="size-full wp-image-193" /></a></p>
<p>Anyway, I guess I didn&#8217;t finish it by Christmas and lost interest.  I would love to get something finished by next Christmas, but for now you can take a look at what could be. <img src='http://blog.seremeres.com/wp-includes/images/smilies/icon_smile.gif' alt=':)' class='wp-smiley' />   </p>
]]></content:encoded>
			<wfw:commentRss>http://blog.seremeres.com/?feed=rss2&amp;p=190</wfw:commentRss>
		<slash:comments>0</slash:comments>
	
		<media:thumbnail url="http://blog.seremeres.com/wp-content/uploads/2010/12/ChristmasSprites-195x120.png" />
		<media:content url="http://blog.seremeres.com/wp-content/uploads/2010/12/ChristmasSprites.png" medium="image">
			<media:title type="html">ChristmasSprites</media:title>
			<media:description type="html">Fun for the whole family!</media:description>
			<media:thumbnail url="http://blog.seremeres.com/wp-content/uploads/2010/12/ChristmasSprites-195x120.png" />
		</media:content>
		<media:content url="http://blog.seremeres.com/wp-content/uploads/2010/12/Chickadee.jpg" medium="image">
			<media:title type="html">Chickadee</media:title>
			<media:thumbnail url="http://blog.seremeres.com/wp-content/uploads/2010/12/Chickadee-230x120.jpg" />
		</media:content>
		<media:content url="http://blog.seremeres.com/wp-content/uploads/2010/12/Chickadee_02.gif" medium="image">
			<media:title type="html">Chickadee_02</media:title>
			<media:description type="html">Hopefully my animation skills have improved over the past 8 years.</media:description>
		</media:content>
	</item>
		<item>
		<title>Bacon Ornament Tutorial</title>
		<link>http://blog.seremeres.com/?p=149</link>
		<comments>http://blog.seremeres.com/?p=149#comments</comments>
		<pubDate>Sat, 11 Dec 2010 19:46:31 +0000</pubDate>
		<dc:creator>Serena</dc:creator>
				<category><![CDATA[Featured]]></category>
		<category><![CDATA[Tutorial]]></category>

		<guid isPermaLink="false">http://blog.seremeres.com/?p=149</guid>
		<description><![CDATA[Well, after putting them in my app, I realized I wanted some real-life bacon Christmas ornaments! So, After a few attempts, I came up with a way to make them resemble bacon while making them [...]]]></description>
			<content:encoded><![CDATA[<p><img src="http://blog.seremeres.com/wp-content/uploads/2010/12/BaconOrn.jpg" alt="" title="BaconOrn" width="500" height="738" class="aligncenter size-full wp-image-154" /></p>
<p>Well, after <a href="http://games.seremeres.com/?page_id=560" target="_blank">putting them in my app</a>, I realized I wanted some real-life bacon Christmas ornaments! So, After a few attempts, I came up with a way to make them resemble bacon while making them nice enough to hang on the tree!  You can make multiple decorations for your tree, or make one as a Christmas gift to give to a bacon-loving friend! It makes a finished piece about 5 x 2&#8243; with a 3.5&#8243;  ribbon to hang it. </p>
<h3>Materials</h3>
<ul>
<li>Red Felt</li>
<li>Color 2 Felt (White, Beige or Pink)</li>
<li>Red Thread </li>
<li>Thread that matches Color 2</li>
<li>Wire (about 18&#8243; per decoration)</li>
<li>Ribbon (8&#8243; per ornament)</li>
<li><a href="http://seremeres.com/blog/wp-content/uploads/2010/12/BaconPattern.gif" target="_blank">Print out of this pattern</a></li>
</ul>
<h3>Tools</h3>
<ul>
<li>Pins</li>
<li>Needle</li>
<li>Scissors</li>
</ul>
<h3>Optional:</h3>
<ul>
<li>Sewing Machine</li>
<li>Googly Eyes</li>
<li>Black Beads (for eyes)</li>
<li>Black Felt (for mouth)</li>
<li>Glue</li>
<li>Fiber Batting</li>
<li>Liquid Smoke (to give it a nice bacony smell)</li>
</ul>
<h3>Instructions</h3>
<ol class="tutestep">
<li><img class="LeftInset" src="http://blog.seremeres.com/wp-content/uploads/2010/12/BaconStep1.jpg" width="500" />
<p>Cut out the six pieces of felt.  The red pieces of felt should be about 2.5 inches x 5 or 6 inches. You can use <a href="http://seremeres.com/blog/wp-content/uploads/2010/12/BaconPattern.gif" target="_blank">this pattern</a>, or improvise with your own shapes. </p>
<p class="Careful">Make sure the two red pieces of felt match in shape so that they can be stitched back together.)</p>
<p><img class="LeftInset" src="http://blog.seremeres.com/wp-content/uploads/2010/12/BaconStep1b.jpg" width="500" /></li>
<li><img class="LeftInset" src="http://blog.seremeres.com/wp-content/uploads/2010/12/BaconStep2.jpg" width="500" />
<p>Using Pins to hold them in place, stitch the Color 2 pieces onto the red felt using a <a href="seremeres.com/blog/wp-content/uploads/2010/OvercastSt.jpg" target="_blank">overcast stitch</a>. I made the stitch very wide to add to the ripply look of bacon. (Is it weird that I&#8217;m getting hungry now?)</p>
<p class="Careful">Remember to stitch on the right sides of the felt!  The pieces should look mirrored after they are stitched.</p>
<p><img class="LeftInset" src="http://blog.seremeres.com/wp-content/uploads/2010/12/BaconStep2b.jpg" width="500" /></li>
<li><img class="LeftInset" src="http://blog.seremeres.com/wp-content/uploads/2010/12/BaconStep3.jpg" width="500" />
<p>Fold your ribbon in half and sandwich it between the stitched pieces of felt.  The sides with the stitched designs (the &#8216;right sides&#8217;) should be facing inward. Pin them together.</p>
<p class="Careful">Make sure to leave the ribbon sticking out a bit to make sure it&#8217;s caught by the stitching.</p>
<p><img class="LeftInset" src="http://blog.seremeres.com/wp-content/uploads/2010/12/BaconStep3b.jpg" width="500" /></li>
<li><img class="LeftInset" src="http://blog.seremeres.com/wp-content/uploads/2010/12/BaconStep4.jpg" />
<p>Stitch the sides and top, and leave the bottom open. Make sure to stitch right through the green ribbon.
</p>
<p class="Careful">Be sure to backstitch the seams so they don&#8217;t unravel while you turn it inside out!</p>
</li>
<li><img class="LeftInset" src="http://blog.seremeres.com/wp-content/uploads/2010/12/BaconStep5.jpg" />
<p>Turn the piece inside out by pulling the ribbon through the bottom.
</p>
<p class="Careful">Try not to stress the opening too much when you turn it inside out.  </p>
</li>
<li><img class="LeftInset" src="http://blog.seremeres.com/wp-content/uploads/2010/12/BaconStep6.jpg" />
<p>Create a rectangle of wire that will fit inside. Make it big enough to stay at the edges. </p>
<p class="Tip">You can put a bit of cotton batting in to puff the piece a little.  If you want to give the ornament a bacon-y (&#8220;baconish&#8221;? &#8220;bacon-like&#8221;?) scent, put a drop of liquid smoke on the batting and roll it around to distribute it through the fiber before putting it inside.
</p>
<p class="Careful">Make sure the wire is twisted and tucked around itself so that it can&#8217;t poke or scratch anyone.</p>
</li>
<li>
<p>Tuck in the bottom seam and use a ladder stitch to close it. (Unfortunately I didn&#8217;t get a picture of this step, but <a href="http://blog.seremeres.com/wp-content/uploads/2010/10/Step7b.jpg">here&#8217;s what it looks like</a> with the <a href="http://blog.seremeres.com/?p=87">Boo Plush</a>). Here’s some directions on how to do a ladder stitch: <a href="http://www.mimidolls.com/DCC-Techniques/ladder/ladder.htm">http://www.mimidolls.com/DCC-Techniques/ladder/ladder.htm</a>
</p>
</li>
<li>
<p>Bend and fold the wire and crumple the bacon a bit to give the edges a nice curl.</p>
</li>
<li><img class="LeftInset" src="http://blog.seremeres.com/wp-content/uploads/2010/12/FinishedBacon.jpg" />
<p>All done! If you like, add googly eyes black beads for eyes or ribbon to decorate it a little more.  </p>
</li>
</ol>
<p>Well, that&#8217;s it!  Please feel free to post any comments or questions about this! And I love to see finished pieces! And if you&#8217;d like to support my blogging, <a href="http://games.seremeres.com" target="_blank">download one of my iPhone Apps</a> if you have an iPhone.</p>
<p><a href="http://blog.seremeres.com/wp-content/uploads/2010/12/BaconCartoon.jpg"><img src="http://blog.seremeres.com/wp-content/uploads/2010/12/BaconCartoon.jpg" alt="" title="BaconCartoon" width="300" height="443" class="aligncenter size-full wp-image-186" /></a></p>
]]></content:encoded>
			<wfw:commentRss>http://blog.seremeres.com/?feed=rss2&amp;p=149</wfw:commentRss>
		<slash:comments>42</slash:comments>
	
		<media:thumbnail url="http://blog.seremeres.com/wp-content/uploads/2010/12/BaconOrn-230x120.jpg" />
		<media:content url="http://blog.seremeres.com/wp-content/uploads/2010/12/BaconOrn.jpg" medium="image">
			<media:title type="html">BaconOrn</media:title>
			<media:thumbnail url="http://blog.seremeres.com/wp-content/uploads/2010/12/BaconOrn-230x120.jpg" />
		</media:content>
		<media:content url="http://blog.seremeres.com/wp-content/uploads/2010/12/BaconStep1.jpg" medium="image" />
		<media:content url="http://blog.seremeres.com/wp-content/uploads/2010/12/BaconStep1b.jpg" medium="image" />
		<media:content url="http://blog.seremeres.com/wp-content/uploads/2010/12/BaconStep2.jpg" medium="image" />
		<media:content url="http://blog.seremeres.com/wp-content/uploads/2010/12/BaconStep2b.jpg" medium="image" />
		<media:content url="http://blog.seremeres.com/wp-content/uploads/2010/12/BaconStep3.jpg" medium="image" />
		<media:content url="http://blog.seremeres.com/wp-content/uploads/2010/12/BaconStep3b.jpg" medium="image" />
		<media:content url="http://blog.seremeres.com/wp-content/uploads/2010/12/BaconStep4.jpg" medium="image" />
		<media:content url="http://blog.seremeres.com/wp-content/uploads/2010/12/BaconStep5.jpg" medium="image" />
		<media:content url="http://blog.seremeres.com/wp-content/uploads/2010/12/BaconStep6.jpg" medium="image" />
		<media:content url="http://blog.seremeres.com/wp-content/uploads/2010/12/FinishedBacon.jpg" medium="image" />
		<media:content url="http://blog.seremeres.com/wp-content/uploads/2010/12/BaconCartoon.jpg" medium="image">
			<media:title type="html">BaconCartoon</media:title>
			<media:thumbnail url="http://blog.seremeres.com/wp-content/uploads/2010/12/BaconCartoon-230x120.jpg" />
		</media:content>
	</item>
		<item>
		<title>ART: Rei Hino</title>
		<link>http://blog.seremeres.com/?p=140</link>
		<comments>http://blog.seremeres.com/?p=140#comments</comments>
		<pubDate>Thu, 28 Oct 2010 20:51:31 +0000</pubDate>
		<dc:creator>Serena</dc:creator>
				<category><![CDATA[Art]]></category>

		<guid isPermaLink="false">http://blog.seremeres.com/?p=140</guid>
		<description><![CDATA[I want to start posting my pieces in this blog, but I&#8217;m still trying to decide whether to link to deviantart or just post here. In any case I wanted to try their &#8220;embed&#8221; feature. [...]]]></description>
			<content:encoded><![CDATA[<p>I want to start posting my pieces in this blog, but I&#8217;m still trying to decide whether to link to deviantart or just post here.  In any case I wanted to try their &#8220;embed&#8221; feature.  I finished this a while ago, but finally posted it on Deviantart: </p>
<p><object width="450" height="489"><param name="movie" value="http://backend.deviantart.com/embed/view.swf" /><param name="flashvars" value="id=183147289&#038;width=1337" /><param name="allowScriptAccess" value="always" /><embed src="http://backend.deviantart.com/embed/view.swf" type="application/x-shockwave-flash" width="450" flashvars="id=183147289&#038;width=1337" height="489" allowscriptaccess="always"></embed></object><br /><a href="http://www.deviantart.com/deviation/183147289/">Rei Hino</a> by =<a class="u" href="http://sererena.deviantart.com/">sererena</a> on <a href="http://www.deviantart.com">deviant</a><a href="http://www.deviantart.com">ART</a></p>
]]></content:encoded>
			<wfw:commentRss>http://blog.seremeres.com/?feed=rss2&amp;p=140</wfw:commentRss>
		<slash:comments>1</slash:comments>
	
	</item>
		<item>
		<title>Boo Plush Tutorial</title>
		<link>http://blog.seremeres.com/?p=87</link>
		<comments>http://blog.seremeres.com/?p=87#comments</comments>
		<pubDate>Mon, 18 Oct 2010 00:46:59 +0000</pubDate>
		<dc:creator>Serena</dc:creator>
				<category><![CDATA[Tutorial]]></category>

		<guid isPermaLink="false">http://blog.seremeres.com/?p=87</guid>
		<description><![CDATA[Wee! Halloween is around the corner, so I decided to alter my Kirby plush pattern to make a Boo plush tutorial! I made this one as a birthday gift for a friend. Like the the [...]]]></description>
			<content:encoded><![CDATA[<p style="text-align: center;"><a href="http://blog.seremeres.com/wp-content/uploads/2010/10/Finished3.jpg"><img class="size-medium wp-image-89 aligncenter" title="Finished2" src="http://blog.seremeres.com/wp-content/uploads/2010/10/Finished3.jpg" alt="" width="520" /></a></p>
<p>Wee!  Halloween is around the corner, so I decided to alter my <a href="http://blog.seremeres.com/?p=5">Kirby plush pattern</a> to make a Boo plush tutorial! I made this one as a birthday gift for a friend. Like the the Kirby plush, this can be sewed partly by machine, but I made this one by hand. The final plush is about 6 inches high.  It&#8217;s good for beginning or intermediate sewers.  It takes about 2 hours to make.</p>
<p><img src="http://blog.seremeres.com/wp-content/uploads/2010/10/Materials.jpg" /></p>
<h3>Materials and Tools</h3>
<ul>
<li>Two or three 12&#8243; pieces of white felt </li>
<li>Red, White and Black scraps of felt (<a href="http://www.joann.com/joann/catalog/productdetail.jsp?pageName=search&#038;flag=true&#038;PRODID=zprd_02356400a">buy online</a>)</li>
<li>Batting/Stuffing (<a href="http://www.joann.com/joann/catalog/productdetail.jsp?pageName=search&#038;flag=true&#038;PRODID=prd3232">buy online</a>)</li>
<li>Glue (<a href="http://www.joann.com/joann/catalog/productdetail.jsp?pageName=search&#038;flag=true&#038;PRODID=prd53029">I used Aleene&#8217;s Tacky Glue</a>)</li>
<li>White Thread(<a href="http://www.joann.com/joann/catalog/productdetail.jsp?pageName=search&#038;flag=true&#038;PRODID=xprd840925">buy online</a>)</li>
<li>Scissors</li>
<li>Fabric Marker(<a href="http://www.joann.com/joann/catalog/productdetail.jsp?pageName=search&#038;flag=true&#038;PRODID=prd10314">buy online</a>)</li>
<li>Pins</li>
<li>Needle</li>
<li>Sewing Machine (Optional)</li>
<li>The Pattern Print-out: <a href="http://blog.seremeres.com/wp-content/uploads/2010/10/Boopattern1.gif">[Page 1]</a>,<a href="http://blog.seremeres.com/wp-content/uploads/2010/10/Boopattern2.gif">[Page 2]</a></li>
</ul>
<h3>Instructions</h3>
<ol class="tutestep">
<li>
<p><img class="LeftInset" src="http://blog.seremeres.com/wp-content/uploads/2010/10/step1.jpg" alt="Cut out Felt" width="500" /><br />
Print out the pattern (<a href="http://blog.seremeres.com/wp-content/uploads/2010/10/Boopattern1.gif">[Pattern Page 1]</a>,<a href="http://blog.seremeres.com/wp-content/uploads/2010/10/Boopattern2.gif">[Pattern Page 2]</a>) on two letter-size pieces of paper and cut out pieces of the pattern. Use your marker to trace and cut out the shapes of the pattern.</p>
</li>
<li>
<p><img class="LeftInset" src="http://blog.seremeres.com/wp-content/uploads/2010/10/step2.jpg" alt="Sew Pieces Together" width="500" /><br />
Sew the pieces of the 2 large body segments together, putting the &#8216;right sides&#8217; or outside together. The right side should be the smoother, shinier side of the felt. Sew 5/8&#8243; from the edge of the felt. Do the same with the arm stubs.</p>
</li>
<li>
<p><img class="LeftInset" src="http://blog.seremeres.com/wp-content/uploads/2010/10/step3.jpg" alt="Notch Seams" width="500" /><br />
Notch or trim closely along the edges, being careful not to cut into the seams. This will make the seams more flexible when you turn the ball inside-out. Sew and notch the other 2 segments together as well.
</p>
</li>
<li>
<p><img class="LeftInset" src="http://blog.seremeres.com/wp-content/uploads/2010/10/Step4.jpg" alt="Sew Body Pieces Together" width="500" /><br />
Open and flatten the open sides of the sections you just sewed, and put them together, right sides touching. First pin the ends, flattening out the seams so that it will be easy to sew through them. Next, pin the outer edges. Sew all the way around, going through both seams. Be sure to leave an open space about 3 or 4 inches wide so you can turn and stuff the ball.
</p>
</li>
<li>
<p><img class="LeftInset" src="http://blog.seremeres.com/wp-content/uploads/2010/10/Step5.jpg" alt="Turn Body Inside Out" width="500" /><br />
Turn the body inside out and use your fingers to flatten and contour the seams, bringing out the spherical shape.</p>
<p><img class="LeftInset" src="http://blog.seremeres.com/wp-content/uploads/2010/10/Step6.jpg" alt="Turn Body Inside Out" width="500" />
</p>
</li>
<li>
<p><img class="LeftInset" src="http://blog.seremeres.com/wp-content/uploads/2010/10/Step7.jpg" alt="Stuff it" width="500" /><br />
Stuff it!
</p>
</li>
<li>
<p><img class="LeftInset" src="http://blog.seremeres.com/wp-content/uploads/2010/10/Step7b.jpg" alt="" width="500" /><br />
Use a ladder stitch to close the seam.  Here&#8217;s some directions on how to do a ladder stitch: <a href="http://www.mimidolls.com/DCC-Techniques/ladder/ladder.htm">http://www.mimidolls.com/DCC-Techniques/ladder/ladder.htm</a></p>
<p><img class="LeftInset" src="http://blog.seremeres.com/wp-content/uploads/2010/10/Step8.jpg" alt="" width="500" />
</p>
</li>
<li>
<p><img class="LeftInset" src="http://blog.seremeres.com/wp-content/uploads/2010/10/step9.jpg" alt="" width="500" /><br />
Now for the arm stubs.  Turn the arms inside out and then fold the edge over to create a clean edge.  Stuff the arms.
</p>
</li>
<li>
<p><img class="LeftInset" src="http://blog.seremeres.com/wp-content/uploads/2010/10/step10.jpg" alt="" width="500" /><br />
<img class="LeftInset" src="http://blog.seremeres.com/wp-content/uploads/2010/10/Step10b.jpg" alt="" width="500" /><br />
Pin the arms to the Boo and sew them on using a ladder stitch.  I opted to put the arms lower so it could stand on it&#8217;s own a little easier.
</p>
</li>
<li>
<p><img class="LeftInset" src="http://blog.seremeres.com/wp-content/uploads/2010/10/step11.jpg" alt="" width="500" /><br />
Glue the face on the Boo, let dry for a few hours, and you&#8217;re good to go! <img src='http://blog.seremeres.com/wp-includes/images/smilies/icon_biggrin.gif' alt=':D' class='wp-smiley' />
</p>
</li>
</ol>
<p><strong>If you make one of these plushies and have an image posted on the web, please post a link in the comments!  I love seeing people&#8217;s finished works, and I plan on making a separate blog post with the finished plushies!</strong></p>
<p style="text-align: center;">
<span style="font-size: 1.5em;">Liked my tutorial? Interested in supporting a hungry artist? Check out my iPhone apps:</span><br />
<a href="http://itunes.apple.com/app/spin-puzzle/id352266984?mt=8"><img src="http://seremeres.com/images/mockup_05.jpg" style="padding-top: 6px;"></a><br />
<a href="http://itunes.apple.com/app/spin-puzzle-halloween/id397303915?mt=8"><img src="http://seremeres.com/images/SpinPuzzleBoxH.jpg" style="padding-top: 6px;"></a><br />
<span style="font-size: 0.7em;">Seriously. I&#8217;m poor</span></p>
]]></content:encoded>
			<wfw:commentRss>http://blog.seremeres.com/?feed=rss2&amp;p=87</wfw:commentRss>
		<slash:comments>22</slash:comments>
	
		<media:thumbnail url="http://blog.seremeres.com/wp-content/uploads/2010/10/Finished2-230x120.jpg" />
		<media:content url="http://blog.seremeres.com/wp-content/uploads/2010/10/Finished2.jpg" medium="image">
			<media:title type="html">Finished2</media:title>
			<media:thumbnail url="http://blog.seremeres.com/wp-content/uploads/2010/10/Finished2-230x120.jpg" />
		</media:content>
		<media:content url="http://blog.seremeres.com/wp-content/uploads/2010/10/Materials.jpg" medium="image" />
		<media:content url="http://blog.seremeres.com/wp-content/uploads/2010/10/step1.jpg" medium="image">
			<media:title type="html">Cut out Felt</media:title>
		</media:content>
		<media:content url="http://blog.seremeres.com/wp-content/uploads/2010/10/step2.jpg" medium="image">
			<media:title type="html">Sew Pieces Together</media:title>
		</media:content>
		<media:content url="http://blog.seremeres.com/wp-content/uploads/2010/10/step3.jpg" medium="image">
			<media:title type="html">Notch Seams</media:title>
		</media:content>
		<media:content url="http://blog.seremeres.com/wp-content/uploads/2010/10/Step4.jpg" medium="image">
			<media:title type="html">Sew Body Pieces Together</media:title>
		</media:content>
		<media:content url="http://blog.seremeres.com/wp-content/uploads/2010/10/Step5.jpg" medium="image">
			<media:title type="html">Turn Body Inside Out</media:title>
		</media:content>
		<media:content url="http://blog.seremeres.com/wp-content/uploads/2010/10/Step6.jpg" medium="image">
			<media:title type="html">Turn Body Inside Out</media:title>
		</media:content>
		<media:content url="http://blog.seremeres.com/wp-content/uploads/2010/10/Step7.jpg" medium="image">
			<media:title type="html">Stuff it</media:title>
		</media:content>
		<media:content url="http://blog.seremeres.com/wp-content/uploads/2010/10/Step7b.jpg" medium="image" />
		<media:content url="http://blog.seremeres.com/wp-content/uploads/2010/10/Step8.jpg" medium="image" />
		<media:content url="http://blog.seremeres.com/wp-content/uploads/2010/10/step9.jpg" medium="image" />
		<media:content url="http://blog.seremeres.com/wp-content/uploads/2010/10/step10.jpg" medium="image" />
		<media:content url="http://blog.seremeres.com/wp-content/uploads/2010/10/Step10b.jpg" medium="image" />
		<media:content url="http://blog.seremeres.com/wp-content/uploads/2010/10/step11.jpg" medium="image" />
		<media:content url="http://seremeres.com/images/mockup_05.jpg" medium="image" />
		<media:content url="http://seremeres.com/images/SpinPuzzleBoxH.jpg" medium="image" />
	</item>
		<item>
		<title>How to get FREE ART</title>
		<link>http://blog.seremeres.com/?p=69</link>
		<comments>http://blog.seremeres.com/?p=69#comments</comments>
		<pubDate>Mon, 04 Oct 2010 03:08:18 +0000</pubDate>
		<dc:creator>Serena</dc:creator>
				<category><![CDATA[Article]]></category>
		<category><![CDATA[advice]]></category>
		<category><![CDATA[art]]></category>
		<category><![CDATA[games]]></category>

		<guid isPermaLink="false">http://blog.seremeres.com/?p=69</guid>
		<description><![CDATA[Ok, so the title is a little sensationalistic, but I was afraid &#8220;How to Make Your Collaborative Project Succeed&#8221; was a kind of boring title. A few times a month I get an email that [...]]]></description>
			<content:encoded><![CDATA[<p style="text-align: center;"><a href="http://blog.seremeres.com/wp-content/uploads/2010/10/FreeArt.png"><img class="size-full wp-image-77 aligncenter" title="FreeArt" src="http://blog.seremeres.com/wp-content/uploads/2010/10/FreeArt.png" alt="" width="460" height="240" /></a></p>
<p>Ok, so the title is a little sensationalistic, but I was afraid &#8220;How to  Make Your Collaborative Project Succeed&#8221; was a kind of boring title.</p>
<p>A few times a month I get an email that sounds something like this:</p>
<p><em>&#8220;Hello,  I&#8217;m [NAME] and I&#8217;m working on the super awesome RPG/SHOOTER/MMO!  I saw  your art on deviantart and was wondering if you want to make art for  our game.  I can&#8217;t pay you, but you will get royalties when the game is  successful.&#8221;</em></p>
<p>I always immediately refuse.  I feel bad because  I know this person really believes in their project, but needs help.  A  lot of people have good ideas but they just can&#8217;t do it themselves, nor  do they have the money to pay for professional services and that&#8217;s  completely understandable.  But I&#8217;ve seen way too many of these projects  fail, and I can&#8217;t afford to invest so much time and effort in a someone  else&#8217;s project when I know people are going to lose interest and the  project will fall apart.</p>
<p>But all is not lost!  You can get free  art for your project!  You can even get web designers, programmers and  other professionals to offer their services to you! After some  experience working on indie projects and working in the game industry, I  have picked up a few tips and I&#8217;ve created a little guide to getting  your project to succeed.  <strong>Most of this will refer to online  collaborative game making, but can likely be applied to any sort of  online project, like a web comic, animation, fashion label, etc..</strong><br />
<img class="alignleft size-full wp-image-73" title="1045625_seedling_1" src="http://blog.seremeres.com/wp-content/uploads/2010/10/1045625_seedling_1.jpg" alt="" width="300" height="200" /><strong>Start Small</strong><br />
Start  with a small, simple project.  You may have the technology available to  you to create something that rivals big budget games out there, but you  likely don&#8217;t have the time or manpower available to make it work.  My  advice is not to get too ambitious.  Start with something small,  absolutely tiny, and build upon it.  One finished 25-level puzzle game  is worth more than 100 unfinished MMORPGs.  Finishing even a small  project will really increase your reputation and make people more  willing to work with you as your ideas get more ambitious.</p>
<p><strong>Make a plan</strong><br />
This is the MOST important step.  It actually has two purposes.</p>
<p>1.  It will test your commitment to the project. Creating a detailed plan  is a huge time investment, and if you can stick through it, your project  has a fighting chance!  Sometimes in the process of creating the plan,  you will find it&#8217;s not that good of an idea, or you&#8217;ll lose interest.   This is not a bad thing!  I myself have had some good ideas for games  that were killed in the planning process because as cool as the idea  seemed at first, I just couldn&#8217;t make it fun.  But I don&#8217;t feel bad  about it because I learned things during the process and I didn&#8217;t let  anyone down.</p>
<p><img class="alignright size-medium wp-image-75" title="1182878_17384268" src="http://blog.seremeres.com/wp-content/uploads/2010/10/1182878_17384268-300x225.jpg" alt="" width="300" height="225" />2. The functional purpose of the plan is an obvious  benefit once you&#8217;ve solidified your idea.  It acts as a roadmap and  lets you know who you need to help, how long it will take and give  volunteers a good overview of the idea. Here are some things your plan  needs:</p>
<ul>
<li><strong>Game Design Document</strong> |  If you are designing  the game, this is your time to shine!  I&#8217;m not going to tell you how to  create a Game Design Document (or &#8216;GDD&#8217; ) but basically this is where  you need all your details worked out.  <a href="http://www.pagtech.com/2006/07/04/how-to-write-a-game-design-doc/">Here is a guide to writing a GDD.</a></li>
<li><strong>Timetable/Milestones</strong> |  Your game likely doesn&#8217;t have a deadline imposed by anyone, but  it&#8217;s always good to have a general roadmap of the project.  Don&#8217;t use  any hard dates for these, instead, work in months or weeks.  Here&#8217;s an  example of how you could lay it out.<br />
Month 1 and 2<br />
<em>-Create Character and Background Art<br />
-Create Gameplay Prototype</em><br />
Month 3<br />
<em>-Create Interface Visuals<br />
-Program Menu and Interface</em><br />
Month 4<br />
<em>-Beta Testing</em></li>
<li><strong>Required Assets</strong> |  Basically, a list of every piece of artwork required for your game.   Order it first by the purpose (gameplay, backgrounds, interface,  titles, effects), then by priority, so the important stuff is in first  and it&#8217;s easy to cut out less important assets.</li>
<li><strong>Your Team</strong> |  Ideally, create titles for different roles in the project.  This  way, people can have multiple titles, or the titles can be shifted  around as people join or leave your team. Your artist may have the title  of &#8220;Character Artist&#8221; and &#8220;Effects Designer&#8221;, but if someone good at  effects joins your team, they can take on that title.  Under each title  should include a short description of their role and a list a tasks.   This will give you a good overview of who you will need and help you  recruit more easily.</li>
<li><strong>Distribution/Revenue Model</strong> |   If you plan on making money with your project, make sure it actually  can make money!  How will you be distributing your game, as a download,  or in stores? How will it make money?  Pay-per-download?  Subscriptions?  Ads?  You may want to consider creating a business plan.  Don&#8217;t just  plan on getting &#8220;discovered&#8221;, have a specific plan that you can show  your team members.</li>
</ul>
<p><strong>Make a backup plan</strong><br />
After  planning your project, it will be easier to plan for eventualities.  If  you lose someone from your team, can you replace them?  If your project  gains momentum but you lose interest, can you pass the project on to a  new Lead so that it will live on without you?  What if your revenue  model doesn&#8217;t work?  If you have a backup plan for different ways your  project could fall apart, it probably won&#8217;t!</p>
<p><strong>Acquire a Good Reputation</strong><br />
While  you are working on your plan, you can begin to build a good reputation  in online communities where you can find people to  recruit.  Be helpful and take the time to help people and answer  questions using your own expertise.  If you are generous with your time and advice, people will be much more likely to help you.</p>
<p><strong><img class="size-medium wp-image-76 alignleft" title="1221951_27660008" src="http://blog.seremeres.com/wp-content/uploads/2010/10/1221951_27660008-300x200.jpg" alt="" width="300" height="200" />Get Everything in writing</strong><br />
First,  make sure every team member knows the terms.  Make it clear how, when  and how much the member of your team will be paid, even if it is in  royalties after the project wraps up. Make sure the team member still  gets a portion of royalties for contributing work even if they leave the  project. Royalty agreements should be treated as a serious contract, so  make sure you get some signatures. This is also where your timetable  comes in handy so that your team member knows <em>when</em> they will be paid. Once your project starts, you should have a hard deadline. (example: October 27, 2008)</p>
<p><strong>Have a simple website, and market it!</strong><br />
Once  you have a few pieces of artwork, it&#8217;s time to show it off!  Create a  blog so that people can watch the progress of your project, download  demos, look at screenshots, read story excerpts&#8230; basically, so your  audience can get excited about your game!  Make sure users have a place  to leave comments or feedback. Having an RSS feed or an email newsletter  signup will help people keep track of your project.  Having a facebook page or twitter account is a great way to keep people up to date as well. When a potential  team member sees the excitement surrounding your project and you post an  opening, they might even come to you to offering their services!</p>
<p><strong>Provide a place for your team to meet</strong><br />
Luckily  this is one that most projects get right.  There are many, many ways to  collaborate online now, so make sure your team is on the same page.  It  is easy to set up a free private forum. Provide your team with weekly  progress reports to keep them going.</p>
<p><strong>If you can&#8217;t provide payment, provide incentives</strong><br />
Royalty  incentives become more and more attractive as the project nears  completion, but it&#8217;s so commonly promised at the beginning of a project  that it&#8217;s not an incentive at all. (Neither is &#8220;exposure&#8221;, by the way&#8230;  if you found them, they likely have a good amount of exposure already.)   Consider an &#8220;honorarium.&#8221; This is more of a small gift for the  artist&#8217;s efforts than an actual payment, but it shows the artist that  you are willing to invest a bit of your own money into the project. Just  make sure they know that it is a gift, not a payment or contract.</p>
<p><strong>Lower your Standards</strong> If you have a certain style in mind, grab a lot of images that feature  that art style. But remember that if your artist is working for free,  you need to take what they give you.  Being picky or overly critical  will make the artist question why they are even on the project and they  might even leave your project warning other artists not to join!  The  art may not be perfect, but it is just a risk you have to take when they  are investing their time in your project. Make sure your team members  are having fun!</p>
<p><strong><img class="alignright size-medium wp-image-74" title="1071720_64731155" src="http://blog.seremeres.com/wp-content/uploads/2010/10/1071720_64731155-300x225.jpg" alt="" width="300" height="225" />Break up the work</strong><br />
Keep in mind that  many people have a hard time committing to long term projects, so break  up the work into bite-size chunks so that you are not asking too much of  any one person. This way, you might have multiple artists on the same  project, but the work will get done much faster.</p>
<p><strong>Conclusion</strong><br />
It  sounds like a lot of work, but remember that you are asking for a lot  of work, too.  You don&#8217;t need to have a huge innovative idea, just  something solid.</p>
<p>If I got an email like this, I&#8217;m sure I&#8217;d be way more likely to say yes:<br />
<em><br />
&#8220;Hello,  I&#8217;m [NAME] and I&#8217;m the Lead for [GAME], our team&#8217;s second game. I saw  your art on deviantart and I think you&#8217;d be an awesome addition to our  team.  You can read more information about the game here: [WEBSITE].    have also attached a plan for the project to this email, feel free to  skim it over.  We would like to begin development for this game on  September 1, 2008 and launch the game on March 1, 2009.</em></p>
<p><em>Judging  from your art style, I would love for you to design a few characters  for us. I can&#8217;t pay you in advance, but we can pay you in royalties when  the game is successful.  Royalties will be negotiated prior to you  providing any work and agreed to in a contract. I would like to provide a  small gesture of $50 if you decide to be a part of the project for the  long term.</em></p>
<p><em>Even if you can&#8217;t provide us with art at this time,  any guidance, advice or creative input you could provide would be of  great help.  We would like to sign you up to our private forum to see  the team in action.</em></p>
<p><em>Thanks for taking a look,<br />
[NAME]&#8220;</em></p>
<p>In closing, I&#8217;d like sum it all up with three general tips.</p>
<ul>
<li>Be professional</li>
<li>Create a plan</li>
<li>Make it easy for people to help you</li>
<li>Make people excited about your project</li>
</ul>
<p>Good luck on your efforts!  I hope this was helpful and if you have any comments or suggestions for this article, do tell.  (If anything, those of you who get emails like the one at the beginning of the article can forward people to this.)</p>
<p>Pixel Art by me, Stock Photos from <a href="http://sxc.hu">stock.xchng</a>.</p>
]]></content:encoded>
			<wfw:commentRss>http://blog.seremeres.com/?feed=rss2&amp;p=69</wfw:commentRss>
		<slash:comments>0</slash:comments>
	
		<media:thumbnail url="http://blog.seremeres.com/wp-content/uploads/2010/10/FreeArt-230x120.png" />
		<media:content url="http://blog.seremeres.com/wp-content/uploads/2010/10/FreeArt.png" medium="image">
			<media:title type="html">FreeArt</media:title>
			<media:thumbnail url="http://blog.seremeres.com/wp-content/uploads/2010/10/FreeArt-230x120.png" />
		</media:content>
		<media:content url="http://blog.seremeres.com/wp-content/uploads/2010/10/1045625_seedling_1.jpg" medium="image">
			<media:title type="html">1045625_seedling_1</media:title>
			<media:thumbnail url="http://blog.seremeres.com/wp-content/uploads/2010/10/1045625_seedling_1-230x120.jpg" />
		</media:content>
		<media:content url="http://blog.seremeres.com/wp-content/uploads/2010/10/1182878_17384268.jpg" medium="image">
			<media:title type="html">1182878_17384268</media:title>
			<media:thumbnail url="http://blog.seremeres.com/wp-content/uploads/2010/10/1182878_17384268-230x120.jpg" />
		</media:content>
		<media:content url="http://blog.seremeres.com/wp-content/uploads/2010/10/1221951_27660008.jpg" medium="image">
			<media:title type="html">1221951_27660008</media:title>
			<media:thumbnail url="http://blog.seremeres.com/wp-content/uploads/2010/10/1221951_27660008-230x120.jpg" />
		</media:content>
		<media:content url="http://blog.seremeres.com/wp-content/uploads/2010/10/1071720_64731155.jpg" medium="image">
			<media:title type="html">1071720_64731155</media:title>
			<media:thumbnail url="http://blog.seremeres.com/wp-content/uploads/2010/10/1071720_64731155-230x120.jpg" />
		</media:content>
	</item>
		<item>
		<title>Lighting in Layers</title>
		<link>http://blog.seremeres.com/?p=54</link>
		<comments>http://blog.seremeres.com/?p=54#comments</comments>
		<pubDate>Sun, 03 Oct 2010 23:32:01 +0000</pubDate>
		<dc:creator>Serena</dc:creator>
				<category><![CDATA[Tutorial]]></category>

		<guid isPermaLink="false">http://blog.seremeres.com/?p=54</guid>
		<description><![CDATA[Normally artists shade their art by adding darker colors where shadows appear on a subject. I want to show you another method that involves &#8216;painting light&#8217; directly onto the character. Using an additive blending mode, [...]]]></description>
			<content:encoded><![CDATA[<p>Normally artists  shade their art by adding darker colors where shadows appear on a subject.  I want to show you another method that involves &#8216;painting light&#8217; directly onto the character.  Using an <strong>additive</strong> blending mode, you can create an effect that looks like real light. This tutorial is a continuation of <a href="http://blog.seremeres.com/?p=39">Basic Lighting</a>.</p>
<p><strong>Review: Radiosity and reflected light</strong></p>
<p>Notice how the moon can brighten the landscape even though it doesn&#8217;t emit it&#8217;s own light? Reflected light can be very powerful, yet many beginning artists don&#8217;t even notice it. It can add a very nice dimension of color to your artwork. If you stood in a field of bright yellow flowers, or wore a yellow scarf, the light would bounce from the sun to the flowers/scarf to the bottom of your neck, creating a yellow glow on the bottom of your neck. The word &#8220;radiosity&#8221; is from a lighting function in 3D programs. It&#8217;s also called &#8220;color-bleeding&#8221;.</p>
<p><strong>Contrast and Diffuse light</strong></p>
<p>Light sources range from contrast to diffuse. Large, dim light sources, like the sky, or reflected light from another object are very soft. They create soft, graded shadows. Lights that are emanating form a single point and/or are very intense are called contrast. It creates hard, dark shadows.</p>
<p><strong>Multiple Light Sources</strong></p>
<p>I&#8217;d just like to combine the last two concepts to get a feeling of this lighting method. Though in many lighting situations there is only one light source emitting light, usually there iare more. For example, outdoors, the sun is the light source. But there is also the open sky lighting the land. This is especially noticeable when a cloud briefly blocks out the sun. The light coming from the sky is very diffuse.  The sun creates hard shadows on the subject. While I&#8217;m using the sun and the sky as examples, remember that even  inside, there is light coming from the light fixture AND light  reflecting from the walls. You can see from the example in <a href="http://blog.seremeres.com/?p=39">Basic Lighting</a> that the combination of diffuse and contrast light is  attractive. I&#8217;m going to show you a relatively simple way to imitate this.</p>
<p>Now onto the tutorial. This art was create in <a href="http://www.portalgraphics.net/en/">Opencanvas</a>, but you can use this technique in just about any graphics program, including <a href="http://www.adobe.com/products/photoshop/compare/">Adobe Photoshop</a> and <a href="http://www.systemax.jp/en/sai/">Paint Tool Sai</a>.</p>
<p><a href="http://blog.seremeres.com/wp-content/uploads/2010/10/tut_51.jpg"><img class="alignnone size-full wp-image-57" title="tut_5" src="http://blog.seremeres.com/wp-content/uploads/2010/10/tut_51.jpg" alt="" width="447" height="444" /></a><br />
1. I&#8217;ve created a lame little drawing of some space girl in the grass. So far I have three layers. Lineart, flats and a background. I already created a soft, diffuse shadow underneath the figure from the light from the sky.</p>
<p><a href="http://blog.seremeres.com/wp-content/uploads/2010/10/tut_61.jpg"><img class="alignnone size-full wp-image-58" title="tut_6" src="http://blog.seremeres.com/wp-content/uploads/2010/10/tut_61.jpg" alt="" width="447" height="444" /></a></p>
<p>2. Ok, next step, I colored the flats as though they were lit ONLY by the open sky. Imagine she is under an overcast sky. The shadows have a green-blue flavour because of the reflected light from the grass, and overall the subject has a green-bluish tint, because of the light of her surroundings. Because light is coming from the whole sky, the shadows appear darkest underneath the figure (since the ground is lighting the subject the least). Diffuse light doesn&#8217;t create an highlights, just soft shadows. It rarely creates speculars (small white circular lights that appear on glossy, reflective objects like eyeballs or hair&#8230; I may do an entire tutorial on speculars some time since I often see them misused).</p>
<p><a href="http://blog.seremeres.com/wp-content/uploads/2010/10/tut_71.jpg"><img class="alignnone size-full wp-image-59" title="tut_7" src="http://blog.seremeres.com/wp-content/uploads/2010/10/tut_71.jpg" alt="" width="447" height="444" /></a><br />
3. Now we&#8217;re going to imagine that the cloud has passed over, and now the light from the sun is bearing down on this confused space-girl! First I created an layer with &#8220;Add&#8221; blend mode (use<strong> Linear Dodge</strong> layer if you&#8217;re using <em><strong>Photoshop</strong></em> and <strong>Luminosity</strong> if you&#8217;re using <em><strong>Paint Tool Sai</strong></em>), and I imagined that the light was coming almost directly from above. The sun cast a very yellow-ish light, so I mostly used yellow to light her. I can&#8217;t really tell you where to put the lighting here, as it&#8217;s wherever you want it to shine from. (Here&#8217;s what my lighting layer look like on normal/standard lighting mode: <a href="http://blog.seremeres.com/wp-content/uploads/2010/10/sunlight_layer1.jpg">here</a> ) I also made sure to light the things around her, which explains the god-awful grass-lighting. Remember this is just an example.</p>
<p>Well, hopefully this gives you a little more insight into lighting, shading and coloring.  Happy drawing!</p>
<p><em><strong>Have you made a picture using this technique?  Post a link to it in the comments!</strong></em></p>
<div id="_mcePaste" style="position: absolute; left: -10000px; top: 228px; width: 1px; height: 1px; overflow: hidden;">(While I&#8217;m using the sun and the sky as examples, remember that even  inside, there is light coming from the light fixture AND light  reflecting from the walls.)</div>
]]></content:encoded>
			<wfw:commentRss>http://blog.seremeres.com/?feed=rss2&amp;p=54</wfw:commentRss>
		<slash:comments>0</slash:comments>
	
		<media:thumbnail url="http://blog.seremeres.com/wp-content/uploads/2010/10/tut_51-230x120.jpg" />
		<media:content url="http://blog.seremeres.com/wp-content/uploads/2010/10/tut_51.jpg" medium="image">
			<media:title type="html">tut_5</media:title>
			<media:thumbnail url="http://blog.seremeres.com/wp-content/uploads/2010/10/tut_51-230x120.jpg" />
		</media:content>
		<media:content url="http://blog.seremeres.com/wp-content/uploads/2010/10/tut_61.jpg" medium="image">
			<media:title type="html">tut_6</media:title>
			<media:thumbnail url="http://blog.seremeres.com/wp-content/uploads/2010/10/tut_61-230x120.jpg" />
		</media:content>
		<media:content url="http://blog.seremeres.com/wp-content/uploads/2010/10/tut_71.jpg" medium="image">
			<media:title type="html">tut_7</media:title>
			<media:thumbnail url="http://blog.seremeres.com/wp-content/uploads/2010/10/tut_71-230x120.jpg" />
		</media:content>
	</item>
		<item>
		<title>Basic Lighting</title>
		<link>http://blog.seremeres.com/?p=39</link>
		<comments>http://blog.seremeres.com/?p=39#comments</comments>
		<pubDate>Sun, 03 Oct 2010 22:59:02 +0000</pubDate>
		<dc:creator>Serena</dc:creator>
				<category><![CDATA[Tutorial]]></category>

		<guid isPermaLink="false">http://blog.seremeres.com/?p=39</guid>
		<description><![CDATA[Understanding light is the basis of good coloring. Here are a few basic tips to help you to understand a little bit more about how light works and how to use it in your art. [...]]]></description>
			<content:encoded><![CDATA[<p>Understanding light is the basis of good coloring. Here are a few basic tips to help you to understand a little bit more about how light works and how to use it in your art.</p>
<p><strong>Color of light</strong></p>
<p><strong><a href="http://blog.seremeres.com/wp-content/uploads/2010/10/lightcolors.jpg"><img class="alignnone size-full wp-image-40" title="lightcolors" src="http://blog.seremeres.com/wp-content/uploads/2010/10/lightcolors.jpg" alt="" width="538" height="180" /></a><br />
</strong></p>
<p>Light comes in all kinds of colors. Indoor lighting usually has a golden, yellow-tinge. Outdoor light is often very blue, but changes depending on the time of day (beautiful pink sunrises and orange sunsets). Keep this in mind, as it can have a lot to do with setting the mood in a painting.</p>
<p><strong>Position of light</strong></p>
<p>We all know the general lighting cliches, under-lighting makes a character look menacing, backlighting can make them look suspiscious, lighting from the side makes them look heroic, etc. Experiment with lighting positions to suit the mood of your image. Try to break out of the top-side lighting convention in anime art (I know I need to.)</p>
<p><strong>Degree of diffuse</strong></p>
<p><strong><a href="http://blog.seremeres.com/wp-content/uploads/2010/10/lightdiffuse.jpg"><img class="alignnone size-full wp-image-41" title="lightdiffuse" src="http://blog.seremeres.com/wp-content/uploads/2010/10/lightdiffuse.jpg" alt="" width="538" height="180" /></a><br />
</strong></p>
<p>There are two types of light we call diffuse and contrast lighting. Diffuse lighting is soft, ambient lighting. In indoor scenes, diffuse lighting comes from light bounced off the walls. In outdoor scenes, it is lighting from the sky, but not the sun. In general, diffuse lighting comes from dim light coming from a large area. On the other hand, we have contrast lighting. Contrast lighting is direct comes from a strong source, usually a point. Direct sunlight or light from a spotlight or bare lightbulb are examples of contrast lighting.</p>
<p>You may have noticed that in most lighting situations, both diffuse and direct lighting are present, which brings us to the next point.</p>
<p><strong>Multiple Lights</strong></p>
<p>The most common example of multiple lighting is the light from the sun and the light from the sky. The light from the sun creates hard shadows, while the light from the sky lightens the shadows and create some softer secondary shadows within the shadows cast by the sun. Keep this in mind while you are coloring, you can create some very interesting and beatiful effects.</p>
<p>Another popular multiple-lighting scheme is <a href="http://en.wikipedia.org/wiki/Three-point_lighting">three-point lighting</a>. This type of lighting is used commonly in film, television and photography, especially when lighting people.</p>
<p><strong><br />
Radiosity and bounced-light</strong></p>
<p><strong><a href="http://blog.seremeres.com/wp-content/uploads/2010/10/tut_3.jpg"><img class="alignnone size-full wp-image-42" title="tut_3" src="http://blog.seremeres.com/wp-content/uploads/2010/10/tut_3.jpg" alt="" width="280" height="280" /></a><br />
</strong></p>
<p>Bounced-light can create really beautiful effects in one&#8217;s art. For example, the blue pale lightness of the shadows in Hyung Tae Kim&#8217;s work is essentially meant to be white reflected-light from the pale, white surroundings. Another example is if you hold a yellow flower under someone&#8217;s chin, you will see that even though it doesn&#8217;t emit light, it creates a little yellow glow on their skin. because bounced-light often comes from a surface rather than a point, it is very diffused. Filmmakers and photographers often use &#8220;fill cards&#8221; to bounce soft light onto a subject.</p>
<p><strong><br />
Cast-shadows vs. Shading</strong></p>
<p><strong><a href="http://blog.seremeres.com/wp-content/uploads/2010/10/tut_4.jpg"><img class="alignnone size-full wp-image-43" title="tut_4" src="http://blog.seremeres.com/wp-content/uploads/2010/10/tut_4.jpg" alt="" width="275" height="275" /></a><br />
</strong></p>
<p>Shading and shadows are different. A shadow is created when light is blocked by an opaque object. Shading is the measure darkness of a surface determined by the the angle it faces the light. These two types of shade look different, so keep it in mind when you color.</p>
]]></content:encoded>
			<wfw:commentRss>http://blog.seremeres.com/?feed=rss2&amp;p=39</wfw:commentRss>
		<slash:comments>1</slash:comments>
	
		<media:thumbnail url="http://blog.seremeres.com/wp-content/uploads/2010/10/lightcolors-230x120.jpg" />
		<media:content url="http://blog.seremeres.com/wp-content/uploads/2010/10/lightcolors.jpg" medium="image">
			<media:title type="html">lightcolors</media:title>
			<media:thumbnail url="http://blog.seremeres.com/wp-content/uploads/2010/10/lightcolors-230x120.jpg" />
		</media:content>
		<media:content url="http://blog.seremeres.com/wp-content/uploads/2010/10/lightdiffuse.jpg" medium="image">
			<media:title type="html">lightdiffuse</media:title>
			<media:thumbnail url="http://blog.seremeres.com/wp-content/uploads/2010/10/lightdiffuse-230x120.jpg" />
		</media:content>
		<media:content url="http://blog.seremeres.com/wp-content/uploads/2010/10/tut_3.jpg" medium="image">
			<media:title type="html">tut_3</media:title>
			<media:thumbnail url="http://blog.seremeres.com/wp-content/uploads/2010/10/tut_3-230x120.jpg" />
		</media:content>
		<media:content url="http://blog.seremeres.com/wp-content/uploads/2010/10/tut_4.jpg" medium="image">
			<media:title type="html">tut_4</media:title>
			<media:thumbnail url="http://blog.seremeres.com/wp-content/uploads/2010/10/tut_4-230x120.jpg" />
		</media:content>
	</item>
	</channel>
</rss>
